 Clockwork Blog
Shoot 'em up tutorial: 2 - The player's ship

We are now ready to start working in our game, keep reading part 2 of this tutorial to learn how to implement the player’s ship!
We are now ready to start working on the game, so we will begin with the player’s ship. We will define a spritesheet, which contains the relevant information that allows the rendering library to render it on screen. In spritesheets.xml, between the spritesheets tags, copy the following XML code:
<spritesheet name="playerShip" src="images/spaceships.png">
    <states>
      <state name="Idle">
        <layer name="Idle"></layer>
      </state>
    </states>
    <layers>
      <layer name="Idle" x="0" y="0">
        <frame name="Idle"></frame>
      </layer>
    </layers>
    <frames>
      <frame name="Idle" x="0" y="0" w="100" h="100" t="100"></frame>
    </frames>
  </spritesheet>
This defines a spritesheet named playerShip that uses the images found at the specified picture, the one you downloaded earlier. It defines one possible state for that object, called Idle, which only contains a single layer, called Idle too, that itself contains a single frame called Idle (we weren’t particularly inspired). This frame will draw the content of the picture that starts at 0 pixels in the x (horizontal) axis and 0 pixels in the y (vertical) axis, with a width and height of 100px.
If you look at spaceships.png, you will see that this corresponds to the red vessel the player will pilot in order to save the galaxy! This frame lasts 100 ms, but this value is not really important here since we only have one frame that will be continuously looping over itself.
We have successfully defined how a spaceship looks, but that is not enough! Now we want to define how it will act inside the game, and to do so we will need to head to components.js. Inside the array of components (between the square brackets), copy this JavaScript code:
{
        name: "ship",
        events: [
            {
                name: "#setup", code: function (event) {
                    this.var.friction = 0.03;
                    this.var.vx = this.var.vy = 0;
                    this.var.ax = this.var.ay = 0;
                }
            },
            {
                name: "#loop", code: function (event) {
                    this.var.vx += this.var.ax;
                    this.var.vy += this.var.ay;
                    this.var.$x += this.var.vx;
                    this.var.$y += this.var.vy;
                    this.var.vx *= (1 - this.var.friction);
                    this.var.vy *= (1 - this.var.friction);
                }
            }
        ]
    }
Congratulations, this is your first component! A component is a piece of code that defines (totally or partially) how some objects in your game will behave. This component implements a generic spaceship, as you can deduct by its name, and has two events. Events are pieces of code that execute when something interesting happens, and these two are the most important (that is why they have a hashtag, they are keywords reserved by the engine). The #setup event will execute whenever the object is spawned, and the #loop event will execute once per frame. As you can probably deduce, we are using the setup event to initialize some values, and the loop to update them. Each object has inner variables that can be accessed and modified via the this.var.whatever syntax.
Here we are implementing a classic physics model: you might remember from your high school physics that speed is the derivative of position with respect of time, and acceleration is the derivative of speed with respect of time. Don’t worry, we won’t use any derivatives here! We just tell the object to sum the value of its acceleration in each axis (movement can be decomposed in the x and y axis through the magic of vectors :D ) to the speed, and update the position according to the speed. Finally, we are slowing down the object by reducing its velocity according to its friction. You might notice the dollar signs before the x and y, you must use variables starting by $ to indicate the engine that they are necessary for drawing the object so it makes it available to the rendering library. As you can guess, knowing the position of an object is vital for drawing it on the screen!
All this is great for modelling the behavior of a generic spaceship, but we are not interested in generic spaceships! We want to implement the player ship, and to do so we are going to place a second component, right after the previous one (if you are new to JavaScript dont forget the comma!):
    ,{
        name: "playerShip",
        sprite: "playerShip",
        inherits: "ship"
    }
Surprise, this component is different from the previous one! We are not defining any event, but instead are using two new properties:
sprite: This sets the spritesheet used to render an object, in this case it tells it to use the spritesheet we defined earlier.inherits: This sets a “parent” component from which we will inherit all its properties if we don’t say otherwise. Thanks to this, all the ship events will be added to the playerShip.
So now we have successfully defined the player ship, it is time to check our progress. Go to levels.xml and inside the mainLevel level, where you previously removed the dog, place this line:
<object name="playerShip" type="playerShip" x="600" y="600" ></object>This will tell the engine to spawn an object called playerShip that implements the component playerShip, and place it at the coordinates (600,600).
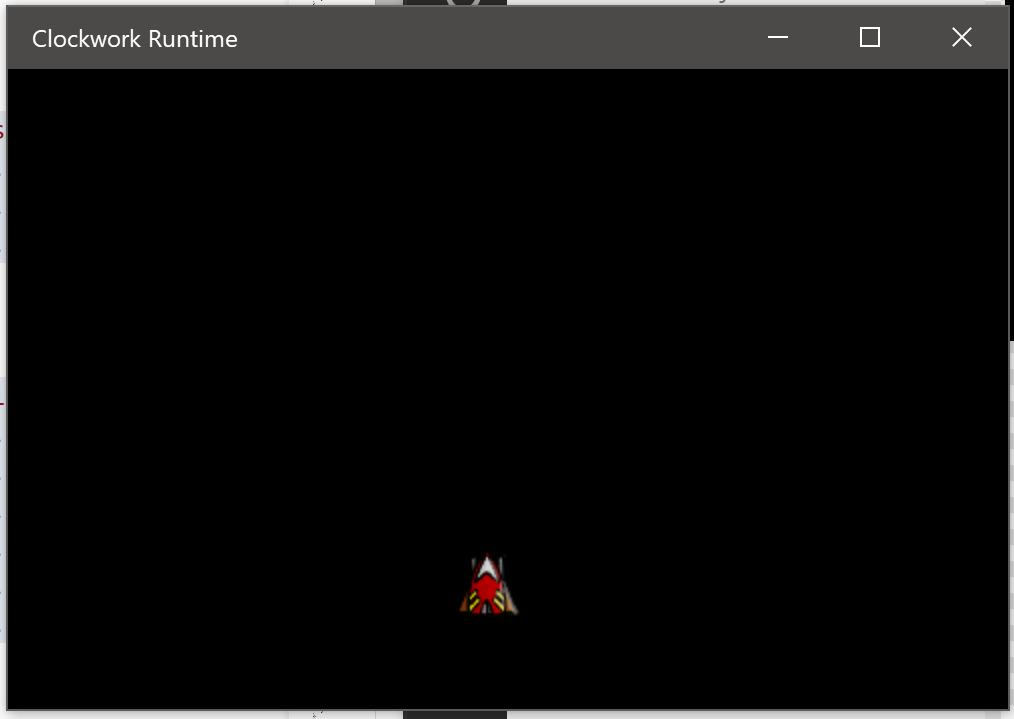
We are now ready for takeoff! Press F1 and execute the Deploy Clockwork Project command. The Runtime will launch and install your game, and if everything is fine you will see your new fancy game tile. Click it to run your game, which should show the red ship still at the bottom of the empty black screen. This might not seem very impressive to others, but while implementing this you already learned most of the stuff you need to create Clockwork games.
The ship is now ready for takeoff, head to part 3 of this tutorial to learn how to implement keyboard controls!